
Links and Link Types
Which link type to choose, what every option does, and how split tests and rotators work.
This is the page you will use most. Here you create the links you hand out, decide where each click goes, and check how they are performing. Everything on this page is explained below in plain language.
Step 1: Choose a link type
Click New link and the first thing you are asked is what kind of link you want. This choice matters because it decides what happens on each click. You can always create a different link later, so you are not locked in.
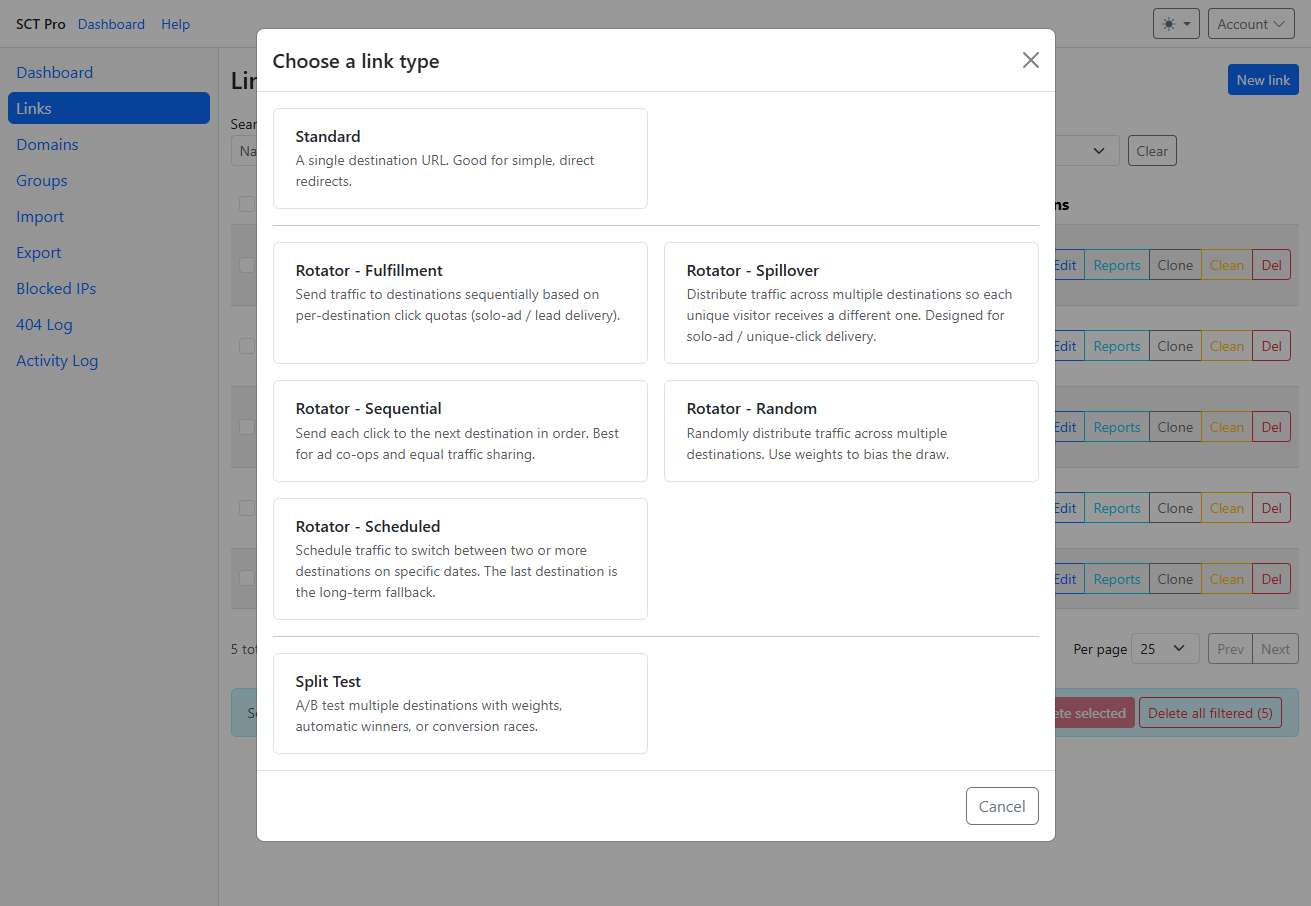
Quick answer: which one do I want?
| What you want to do | Choose |
|---|---|
| Send everyone to one page | Standard |
| Find out which of two pages sells better | Split Test |
| Share traffic evenly between partners | Rotator - Sequential |
| Send more traffic to one page and less to another | Rotator - Random |
| Deliver a promised number of clicks to each buyer | Rotator - Fulfillment |
| Give each new visitor a different destination | Rotator - Spillover |
| Change where a link goes on a set date | Rotator - Scheduled |
The types explained one by one
Standard
What happens: every click goes to the same page. That is all.
Use it for: the vast majority of links — a product page, a signup form, a blog post, a booking page. Because you own the short link, you can change the destination later without changing the address you already shared. That alone makes it worth using instead of raw links in emails and printed material.
Do not use it if: you need more than one destination.
Standard links can also track conversions (sales, signups). After you save the link, copy the Conversion script from the Destination card and paste it on your thank-you page — see "Tracking conversions" below.
Split Test
What happens: visitors are divided between two or more pages. You then compare the results and keep the page that performs better.
Use it for: settling arguments with data. "Does the short sales page or the long one convert better?" Send half the traffic to each and find out.
Important: a split test measures conversions (sales, signups), not just clicks. That requires installing a small snippet of code on each destination's thank-you page — see "Tracking conversions" below. Without it, you can still split traffic, but the app cannot pick a winner for you.
Do not use it if: you get very little traffic. With a handful of visitors, results are mostly luck. Also skip it if you already know where you want people to go.
Rotator - Sequential
What happens: clicks take strict turns. First click to destination 1, next to destination 2, next to destination 3, then back to the start.
Use it for: sharing traffic fairly. This is the classic choice for ad co-ops and partner arrangements where everyone is entitled to an equal share.
Settings you will see:
- Weight (per destination) — give a destination a bigger share of the turns.
- Daily cap (per destination) — the most clicks that destination may receive in a day. Useful when a partner can only handle so much traffic.
- Fallback URL — required. Where clicks go if there are no destinations available or all of them have hit their daily cap. Without this, capped traffic would have nowhere to land.
- Sticky returning visitors — send someone back to the destination they saw last time instead of advancing the rotation, for up to a number of days you choose (1–365).
Do not use it if: you need randomness or date-based switching.
Rotator - Random
What happens: each click is sent to a randomly chosen destination. Over many clicks this evens out, but any individual click is a coin toss.
Use it for: spreading traffic without strict turns, or deliberately favoring one page. Turn on Use weights to bias the random draw and give a proven page a weight of 3 against a new page's 1 — the new page then gets roughly a quarter of the traffic, so you can try it without risking much.
Settings you will see:
- Weighted draw — off means every destination has an equal chance; on lets you set a Weight per destination.
- Sticky returning visitors — returning visitors go back to their first random pick, remembered by browser cookie for the number of days you set. Note that a different device or cleared cookies counts as a new visitor.
Do not use it if: a partner requires exactly equal delivery — random is only even in the long run. Use Sequential instead.
Rotator - Fulfillment
What happens: all traffic goes to the first destination until it reaches its quota of clicks, then moves to the next one, and so on.
Use it for: delivering a promised amount of traffic. If you sold three buyers 500 clicks each, give each one a Quota of 500. Traffic fills the first order, then the second, then the third.
Settings you will see:
- Quota (per destination) — how many clicks that destination should receive before traffic moves on.
- Quota metric — whether a quota counts Total clicks (every click) or Unique clicks (one per visitor). If you promised "unique clicks", choose Unique. This locks once the link receives its first click.
- Order of the rows — drag rows to change who gets filled first.
Rows are labelled Current and Fulfilled as delivery progresses, so you can see at a glance which order is being worked on. Note that the last destination keeps receiving traffic even after its quota is met — put your own page last if you do not want to over-deliver to a customer.
Do not use it if: you just want even sharing with no delivery targets.
Rotator - Spillover
What happens: each new visitor is sent to the first destination, and returning visitors move down the list, so different people end up on different destinations. Visitors are remembered by a 30-day browser cookie.
Use it for: giving each person a different offer, or filling one destination and then overflowing into the next.
Settings you will see:
- Repeat-visitor behavior — Advance to next destination shows a returning visitor something new; Send to same destination keeps their experience consistent. This locks once the link gets its first click, so decide before you publish.
- Per-destination caps and Cap metric — optionally limit each destination, counted by total or unique clicks.
- When the sequence ends — Go to fallback URL (send them to a page such as a "sold out" notice), Wrap to top (start over), or Stay on last destination.
Do not use it if: you need strict turn-taking or a controlled experiment.
Rotator - Scheduled
What happens: the link points to one destination, then automatically switches to the next one on the date and time you set. The last destination stays in place indefinitely.
Use it for: anything with a deadline. Point at your early-bird page, switch to full price at midnight on the 15th, then switch to a "registration closed" page when it ends. You set it up once and it happens without you.
Settings you will see:
- Destination URL, Switch date and Switch time per row. You need at least two destinations, and the last row is marked Fallback (no switch) because it stays in place once every switch has happened.
- Timezone — which clock those dates and times follow. Set this deliberately if your audience is in a different region from you.
Do not use it if: you want the destination chosen by performance rather than by the calendar — that is a Split Test.
Step 2: Fill in the basics
Every link type shares these fields on the Details tab.
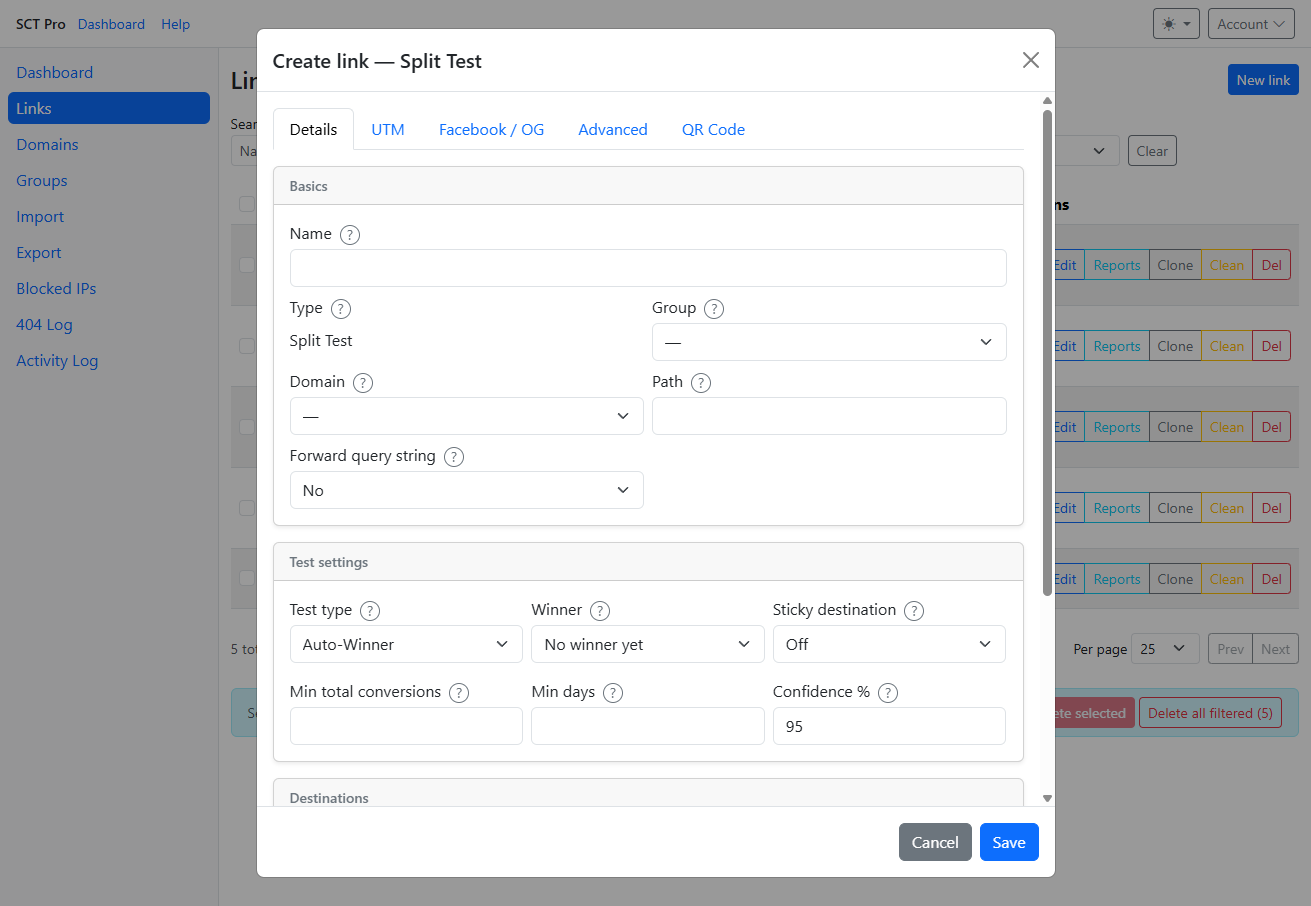
Every field has a ? button next to it. Hover it for a one-line reminder without leaving the page.
- Name
-
A label for your own reference. Visitors never see it. Something like
Spring Sale - Newsletterwill make sense to you in six months;test 2will not. - Group
- Optional. Files this link under a category so you can filter by it later.
- Domain
- Which of your domains this link lives on — the front part of the address. When you create another link, the domain you used last time is preselected (unless you filtered the Links list to a different domain).
- Path
-
The ending visitors will see, such as
spring-sale. Keep it short and readable, since people may type it by hand. Letters, numbers, dashes and underscores only, and it must be unique on that domain. - Forward query string
- Leave this No unless you know you need it. Set it to Yes when your ads or email tool add tracking information to the end of the link and your destination page needs to receive it too.
Split test settings, explained
These appear only on a Split Test, and they control how patient the test is before naming a winner.
- Test type
- Auto-Winner watches the results and picks the winner for you once your conditions are met — the best default. Conversion Race declares the first destination to reach a set number of conversions the winner — simple and fast. Manual never chooses; you decide yourself.
- Winner
- Shows the chosen winner, and lets you override it or force one early.
- Sticky destination
- When on, a visitor keeps seeing the same page on later visits. Turn it on for anything where seeing a different price or offer on a second visit would be confusing.
- Min total conversions
- How many sales or signups must happen before a winner can be declared. This is your protection against being fooled by a lucky start — two sales against one is not evidence.
- Min days
- The shortest the test may run. Traffic behaves differently on weekends and weekdays, so a few days avoids drawing conclusions from one unusual afternoon.
- Confidence %
- How certain you want to be. 95% is the usual standard. Higher means fewer wrong calls but a longer wait; lower gives faster answers you should trust less.
- Weight
- How traffic is divided between destinations. Equal weights are the fair test. Give a new page a smaller weight if you want to protect a page that is already working.
Tracking conversions
Clicks tell you people were interested. Conversions tell you whether it worked. To count conversions, use the Conversion script — a short snippet of code — on your thank-you or order-confirmation page.
Standard links have one snippet on the Destination card. Split tests give each destination row its own snippet.
- Save the link first. Until you do, the box reads Save link to generate snippet.
- Copy the snippet.
- Paste it into the page people reach after they convert — the thank-you or order-confirmation page — just before the closing
</body>tag.
If you are not comfortable editing your website, this is the one step worth handing to whoever built it. Everything else here you can do yourself.
The other tabs
All of these are optional. Skip them until you have a reason.
- UTM
-
Adds campaign labels (source, medium, campaign, and so on) to the destination address so tools like Google Analytics can report which campaign sent each visitor. Only useful if you actually use such a tool. If you do, keep your naming consistent —
newsletterandNewsletterwill be counted as two different sources. - Facebook / OG
- Controls the title, image, and description shown when your link is pasted into social media or a chat app. Worth setting for anything you expect people to share, since a link with a clear image and headline gets noticeably more clicks than a bare address.
- QR Code
- Creates a scannable code for your link, for print, packaging, signs, or slides. Because it points at your short link, you can change the destination later without reprinting anything. You can set a QR Label (the default is Scan Me), its position, font and border, then use Download QR for an image file or Copy to grab embed code for a web page. Choose a domain and path on the Details tab first, or there is nothing to encode yet.
- Advanced
- See below. Most people never need this tab.
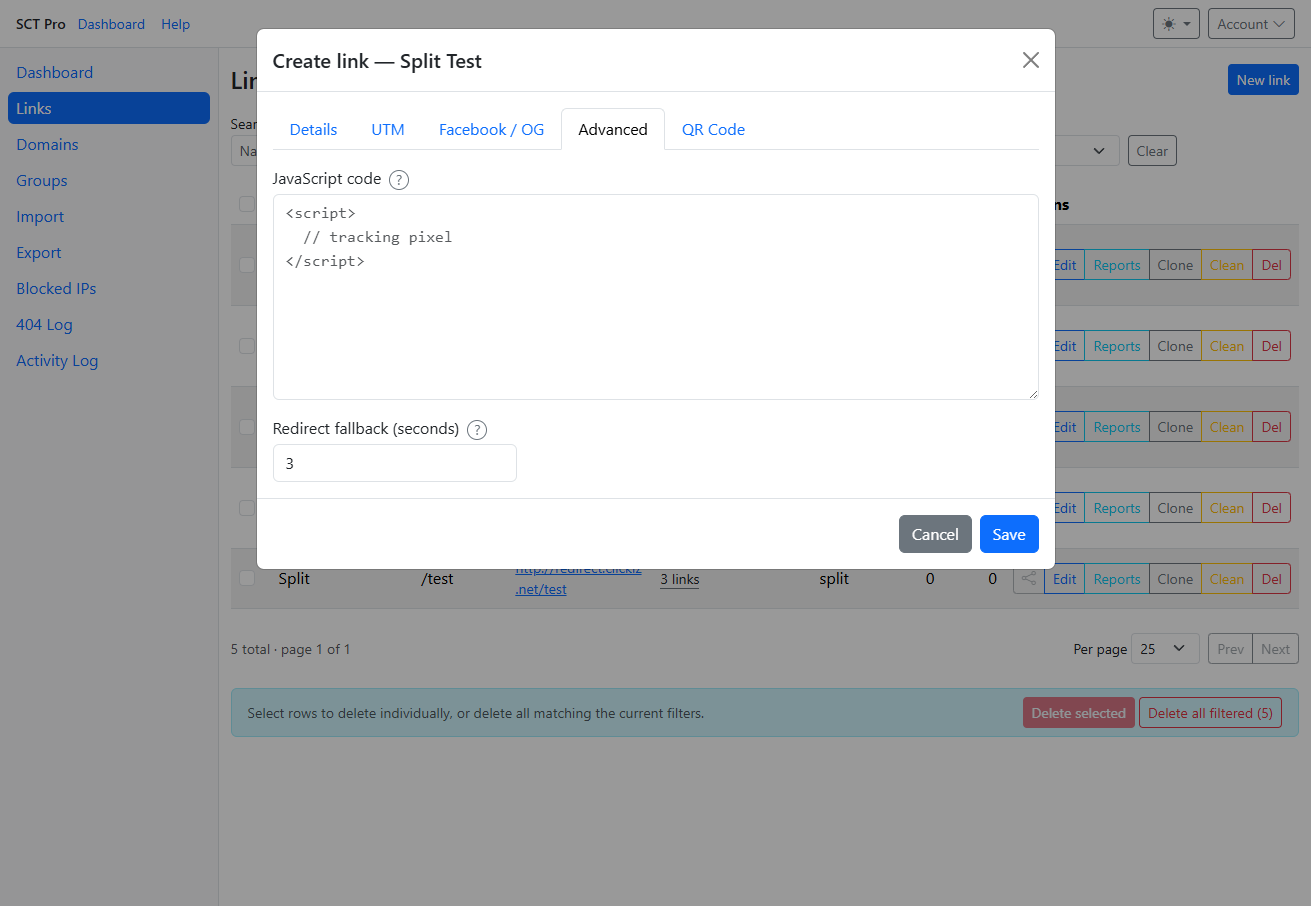
- JavaScript code — for tracking pixels supplied by an advertising platform. It runs in the visitor's browser during the redirect. If you were not given a snippet to paste here, leave it empty.
- Redirect fallback (seconds) — how long to wait for that code before sending the visitor on anyway. The default of 3 protects your visitors from being stuck if the tracking code is slow. Raising it makes people wait longer.
Working with your saved links
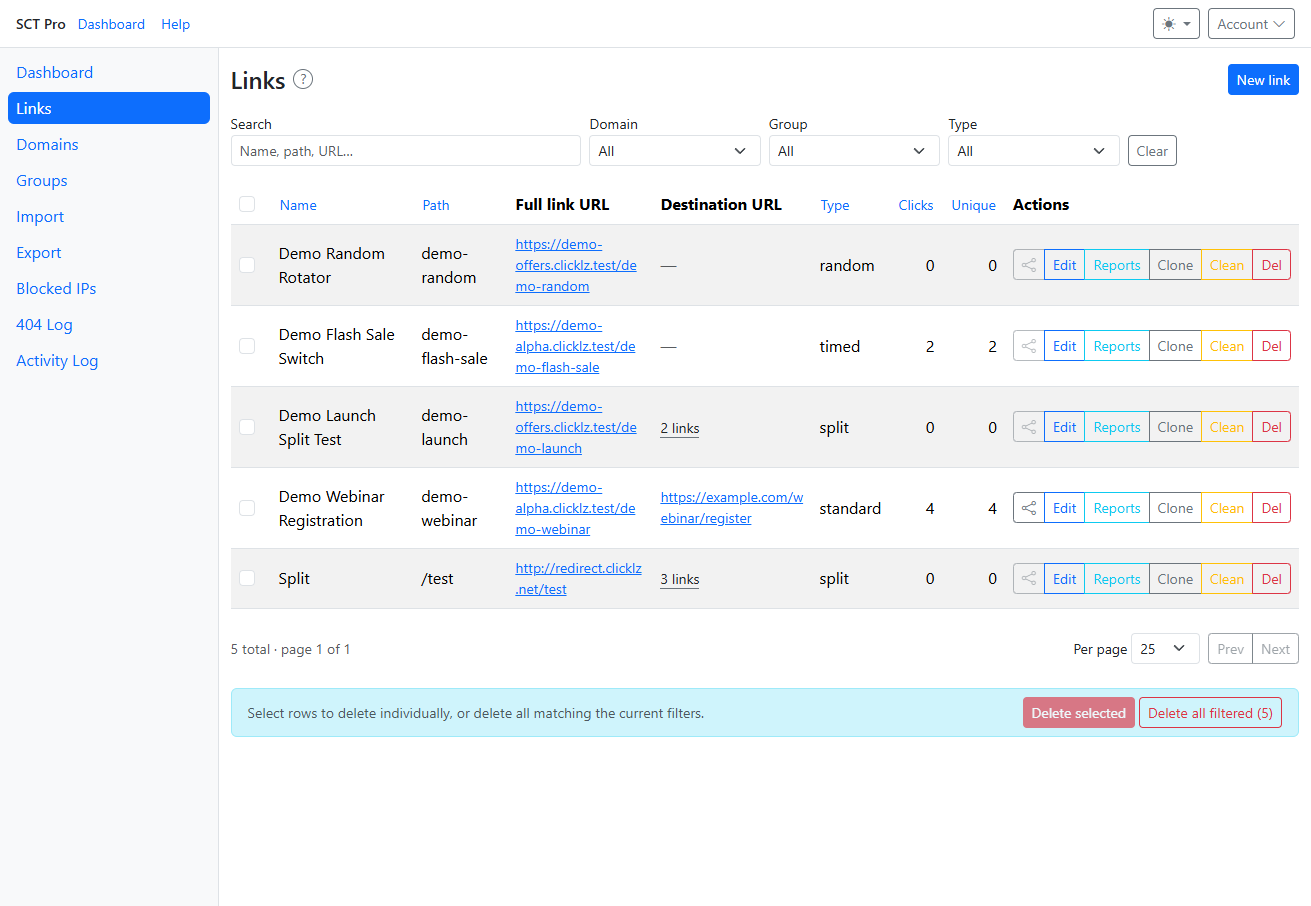
The Full link URL column is the address you share. Each row also has buttons:
- Edit — change any setting, including the destination.
- Reports — see this link's clicks and, for tests and rotators, compare destinations.
- Clone — make a copy to use as a starting point. Much faster than rebuilding settings by hand.
- Clean — erase this link's click history while keeping the link. Handy before a real campaign starts so your own testing does not pollute the numbers. This cannot be undone.
- Del — delete the link. Anyone who clicks the old address afterwards gets an error, so prefer editing the destination over deleting.
- The share icon shows a preview of how the link will look on social media, once you have filled in the Facebook / OG fields.
Above the table, Search plus the Domain, Group and Type filters help you find things once you have a lot of links. Clear resets them.
Habits that keep things simple
- Name links so you can recognize them later, for example
campaign - channel - offer. - Set up your domain and group before creating a batch of links.
- Always click your own link once after saving to confirm it lands where you expect.
- Change the destination on an existing link rather than deleting and re-sharing a new address.
- Change one thing at a time so you can tell what caused a change in results.