
Using Your Own Domain
Already have a website on that domain? Do not point DNS at SCT — use WordPress SCT Connect or the standalone script. New domain or dedicated subdomain? Just point DNS at us.
Your short links need a domain — the part people see before the path. The important question is whether that name already has a website on it. That one fact decides whether you can simply point DNS at SCT, or whether you need the WordPress plugin or standalone script instead.
How a short link is put together
Every short link is just two pieces stuck together:
https://go.example.com (your domain) + /spring-sale (the path you choose on the link)
Because the domain is the part people see and judge, using your own recognizable domain usually gets more clicks than a generic one. A short prefix such as go, links, or click in front of your main website name works well: go.yourcompany.com.
The one decision that matters
Ask yourself: Does this exact name already run a website?
yoursite.com while yoursite.com is also your live site). Do not point that domain’s DNS at SCT — visitors would hit SCT instead of your site, and the website would stop working. Use SCT Connect (WordPress) or the standalone SCT script (other PHP sites) so short links and your website can share the same domain.
go.yoursite.com while your real site stays on yoursite.com). You do not need the WordPress plugin or standalone script. Just point DNS at SCT (the steps below). Your main website is unaffected because you are only changing the short-link name, not the site’s domain.
New here? Most people use a dedicated subdomain and point DNS at us. See also Getting Started.
Point DNS at SCT (new domain or dedicated subdomain)
Use this when the domain or subdomain is for short links only — nothing else important is already answering at that name. You add it in SCT, then tell the internet (DNS) to send that name to our servers. We handle the redirects from there.
Steps:
- In the app, go to Domains and click Add domain. Enter the host name only (for example
go.example.com). - Save. The blue note shows the IP address (or CNAME target) to use.
- Where you manage the domain (GoDaddy, Namecheap, Cloudflare, your host, etc.), add an A record:
- Type: A
- Name / host: the prefix only (
goforgo.example.com), or@if the domain has no prefix - Value / points to: the IP address shown in the app

The blue note at the bottom shows where your domain needs to point.
go or links does not affect your main website or email. Changing the record for your bare domain (@) when a website already lives there can take that site offline — if that is your situation, skip this section and use SCT Connect or the standalone script instead.
DNS changes are usually live within minutes but can take a few hours. If a brand-new domain does not work immediately, wait before changing settings. If the IP address shown in the Domains UI changes later, update your A record to the new value.
Pros
- Simplest once DNS is set — nothing to install on a website.
- Ideal for a new domain or a subdomain used only for tracking.
Cons
- You must change DNS where the domain is managed.
- Wrong choice if a website already uses that same name — the site would stop working.
Same domain as your website — WordPress (SCT Connect)
Use this when short links should live on the same domain as your WordPress site. Install a small plugin; short-link paths are handled by SCT, while the rest of your site keeps working as it does today. You do not change DNS.
Steps:
- Open Account › Integrations.
- Download the SCT Connect plugin and install it on your WordPress site (Plugins › Add New › Upload).
- In the plugin settings, click Connect to Simple Click Tracker and authorize this account.
- Enable redirect handling in the plugin.
- Your site’s domain is linked automatically. Create links in SCT using that same domain name.
Full detail: Account, Billing, and API Keys (SCT Connect section).
Pros
- Keeps your live WordPress site on the same domain — no DNS change.
- Connect and authorize from the plugin; less manual setup than the standalone script.
Cons
- Only works on WordPress.
- You need permission to install plugins on that site.
Same domain as your website — standalone SCT script
Use this when short links should live on the same domain as a PHP site that is not WordPress. Upload a small sct folder, add a Connect API key, and run a one-time installer. Short links are checked with SCT; everything else on your site stays put. You do not point DNS at SCT.
Steps:
- Open Account › Integrations, create an API key of type Connect (WordPress or standalone script), and copy it immediately (it is shown only once).
- Download the standalone package from Integrations or from /downloads/sct.zip.
- Unzip it. Upload the
sctfolder into your site’s public web root (often calledpublic_htmlorwww), so you have/sct/on your domain. - Copy
config.sample.phptoconfig.php(if the installer has not already done so). Paste your API key into theapi_keyline and save. - In your browser, open
https://yoursite.com/sct/install.php. It sets up the Apache rule that sends missing pages to the SCT script. - In SCT, add the domain on Domains if it is not already listed (or create a link — Connect keys can also link the host on first use). Keep the domain Active.
- Create a test link and open it on your domain.
.htaccess support (common on shared hosting). If your host uses nginx or another server, you will need an equivalent “send 404s to /sct/index.php” rule — ask your host, or use a dedicated subdomain and point DNS at SCT instead.
Pros
- Works on non-WordPress PHP sites that already use the domain.
- Keeps your existing DNS and website in place.
Cons
- Needs file upload (FTP, file manager, or similar) and a one-time installer visit.
- Apache +
.htaccessis the supported path out of the box.
Quick comparison
- New domain or dedicated subdomain (no website there) — point DNS at SCT. Skip the plugin and standalone script.
- Same domain as a live WordPress site — SCT Connect. Do not point DNS at SCT.
- Same domain as a live non-WordPress PHP site — standalone script. Do not point DNS at SCT.
Adding a domain in the app
Go to Domains and click Add domain. The New domain box has four settings.
- Domain name
-
Type only the host name, like
go.example.com. Leave outhttps://and anything after the name. If you paste a full address, or use capital letters, it is saved as the lowercase host (https://Go.Example.com/becomesgo.example.com). - 404 redirect URL optional
-
Where to send someone who reaches a short link that does not exist — usually because of a typo or an old link you deleted. Without this, they see an error page and you lose the visitor. With it, they land somewhere useful such as your home page. Enter the full address including
https://. Recommended: set this to your home page or a landing page. - HTTPS
-
Leave this checked. It means your links are built as
https://, the secure version browsers expect. Only uncheck it if this particular host genuinely has no security certificate, otherwise visitors may see browser warnings. - Active
- Only active domains can be used to create and serve links. Unchecking it is like flipping a switch off: existing links on that domain stop working. Useful during a move or maintenance, but not something you want to do by accident.
Reading the Domains list
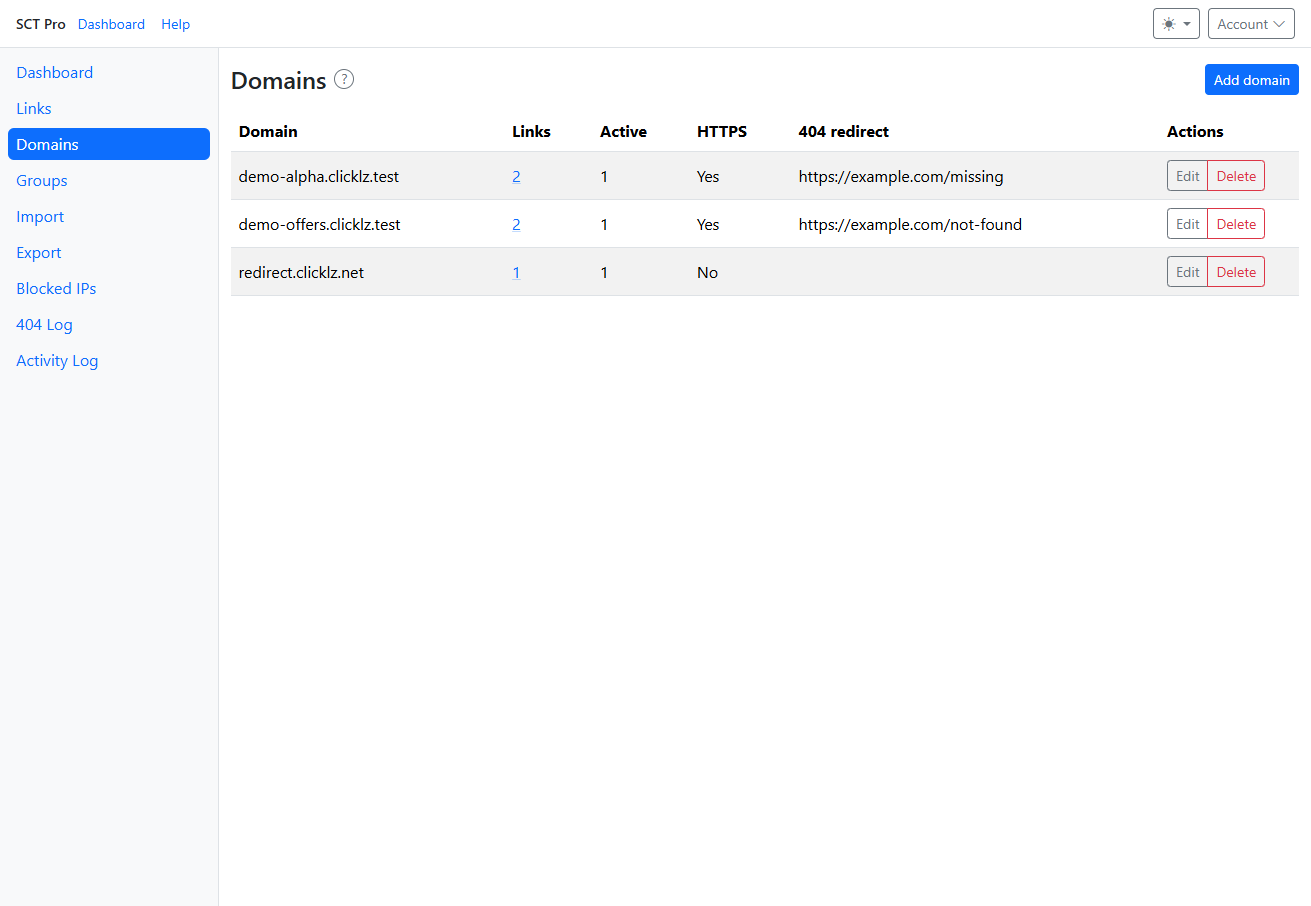
- Links — how many links use this domain. Click the number to see them on the Links page.
- Active and HTTPS — the two switches from the settings above.
- 404 redirect — your safety-net address, if you set one.
- Edit / Delete — change or remove the domain.
Keeping links tidy with groups
Groups are optional labels (like folders) for organizing links. They do not change the short URL visitors see. See Groups for how to create, filter, and merge them.
Links not working after setup? Troubleshooting Common Problems.